What is the High-Pass Filter?
The High Pass Filter (HPF) is a crossover filter network that allows frequencies above the set-point to pass onto the driver. If you set your HPF to 80 Hz, theoretically all of the frequencies above 80 Hz are sent on to the driver while all of the frequencies below 80 Hz are attenuated, or not passed on to the driver. In reality, it’s slightly different.
What is the Low Pass Filter?
The Low Pass Filter (LPF) is a crossover filter network that allows frequencies below the set-point to pass onto the driver. If you set your LPF to 80 Hz, theoretically all of the frequencies below 80 Hz are sent on to the driver while all of the frequencies above 80 Hz are attenuated, or not passed on to the driver. Again, in reality, it’s a little bit different.
The keyword is ‘theoretically’
Crossover filters are not brick walls – they don’t simply stop all frequencies and pass all frequencies at the exact setpoint. The slope of the crossover is key to properly setting your HPF and LPF filters.
What is the ‘slope’?
Crossovers work on a slope that begins at the crossover setting and slowly slopes downward or upward from there (downward for HPF and upward for LPF). For example, in a Low Pass Filter, frequencies above the set-point will be present in the output, the question is ‘how much.’ Exactly ‘how much’ is determined by the slope.
The slope tells us how long (in frequency) before the filter turns off all frequencies to a point where we can’t hear them. Crossover slope (sometimes referred to as ‘roll-off’) defines the rate the signal increases or decreases. This is done by defining how much attenuation takes place per octave. (An octave is a doubling or halving of a frequency: One octave below 80 Hz is 40 Hz; one octave above 80 Hz is 160 Hz).
Is the crossover slope -6, -12, -24 dB or some other number?
A slope of -24 dB is fairly common in hi-fi systems, so we’ll use that as our example. A -24 dB slope means that for every octave you move away from the set frequency, the signal will be attenuated by -24 dB. If you set the crossover HPF for 80 Hz, that means that at 40 Hz (one octave below 80 Hz), the signal is -24 dB lower in volume than at the set point. This also means that one half octave below the set point (60 Hz in this example) the attenuation is only -12 dB. At 70 Hz the attenuation is only -6dB. That’s where the need for setting the HPF and LPF at complementary points becomes critical.
The HPF and LPF set point frequencies must complement each other, otherwise there will be destructive contention between the two filters, with critical musical information caught in the middle. You’ll either get too much or too little of the frequencies in between the setpoints which can make sub/speaker integration almost impossible to get right.
Setting the HPF and LPF
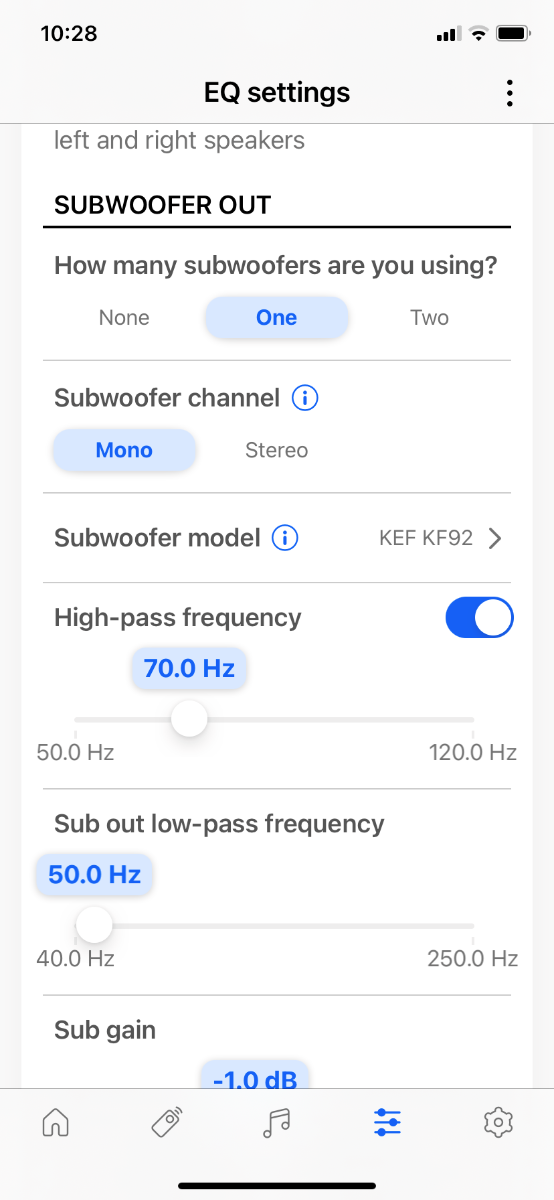
For an example, we’ll use LS50 Wireless II and a single KF92 subwoofer, and examine theKEF Connect app recommended settings in the KEF Connect app. Our engineers have determined that the best starting point when pairing LS50 Wireless II to KF92 is to set the HPF to 70 Hz, and the LPF to 50 Hz. This setting allows the slopes to complement each other so that the frequencies in between the two setpoints are properly passed to the appropriate drivers.
With the HPF filter set to 70 Hz, all frequencies above 70 Hz are sent to the LS50 Wireless II at 0 dB attenuation (full-strength). At 35 Hz (one octave below), the attenuation is -24 dB, which for all intents and purposes is fully attenuated. At one half-octave below the setpoint (around 56 Hz), the attenuation is -12 dB, which is pretty low but possibly still audible.
Setting the LPF for 50 Hz is the best complementary setting. This setting means all of the frequencies below 50 Hz are sent to the subwoofer, and frequencies at 100 Hz (one octave above) are fully attenuated. At one half octave above (75 Hz) the attenuation is approximately -12 dB.
When taken together, each driver is producing frequencies in between the set-points, but at an attenuated level that allows the drivers to work together to produce the proper volume at the frequencies in-between the setpoints.
Your Mileage May Vary
It’s important to note that these settings are merely recommended starting points. Our labs and testing rooms are going to react differently to bass than your listening room – it’s impossible to give a blanket setting for any piece of audio equipment! Your room, ears, tastes and equipment will be different than our engineers’, or that helpful fellow member of your on-line audio group. You’ve got to experiment with what sounds best until you get yourself dialed in. The settings we recommend are just that: recommended places to start when setting up your gear.
Don’t be afraid to experiment – you can always back out to the factory settings if you get stuck in the weeds. You’re not going to damage anything by experimenting with the HPF/LPF settings, on the contrary, by investing a little time you’re likely to come across that optimal setting you were hoping to find!


